When we decided to build a beehive from scratch, we had one strong season behind us with secondhand equipment and a lot of enthusiasm. What we did not have was a clear picture of everything that goes into setting up a brand new hive: the planning calendar, the parts list, the timing of a bee order, and the small decisions that quietly shape your first season. This is the guide we wish we had read before we placed that first order.
If you are weighing whether to keep bees at all, start with our honest take in five beekeeping tips, then come back here when you are ready to gather equipment.

Setting Up a New Hive Versus Splitting a Hive
People use these phrases interchangeably, and they are not the same thing. Setting up a new hive means assembling fresh woodenware and populating it with bees you buy, usually a package or a nucleus colony. Splitting a hive means taking frames of brood, bees, and food from a colony you already own and moving them into a second box to create a separate colony. A split needs an established, overwintered hive to draw from. A brand new setup does not.
This post is about the first path: building and populating your first hive. We did give ours a head start by adding a few frames of drawn comb from a hive we already kept, which is a common way to help a new package settle in faster. That is a boost, not a split, and we will explain why the distinction matters as you read on.

Plan Backward From Spring
The single biggest lesson from our first setup is that the calendar runs the show. Bees and equipment both need to be ordered months before you actually install a colony, and suppliers sell out. Here is the rough timeline that kept us on track:
- January: Place your bee order. Packages and nucleus colonies are reserved early and the best suppliers fill up fast.
- Early February: Research hives, frame sizes, and local suppliers. Decide what style and configuration you want.
- Late February to early March: Order your hive and any tools you still need so everything arrives with time to assemble and paint.
- Spring: Assemble, paint the exterior, place the hive, and install your bees once the weather settles.
One word of caution from experience: confirm exactly what ships assembled and what does not. Our hive arrived painted and ready, but the base came unassembled and unpainted, which was a surprise on a tight schedule. Ask your supplier to spell out the condition of every component before you pay.

The Parts of a Beehive, Explained
A standard Langstroth-style hive is a stack of boxes and a few key pieces. Once you see how they fit together, the parts list stops feeling intimidating.
- Hive stand or base: Lifts the hive off the ground for airflow and protection. Ours arrived unassembled and unpainted, so budget time for it.
- Bottom board: The floor of the hive, sitting between the base and the first box, with the main entrance at the front.
- Brood boxes: The deeper boxes, often run two high, where the queen lays eggs and the colony raises young bees.
- Supers: The boxes where bees store surplus honey. These are typically shallower than brood boxes and easier to lift when full.
- Frames and comb: The removable panels inside each box that hold comb. Bees raise brood and store honey on them, and you pull them for inspections and harvest.
- Queen excluder: A grate that lets workers pass but keeps the larger queen out of the honey supers, so your surplus frames stay brood-free.
- Inner cover: Sits under the lid, supports a feeder, and helps with ventilation.
- Outer cover: The roof that shields the colony from rain and sun.
- Entrance reducer: A small wooden cleat that narrows the entrance to help a young colony defend itself and to control airflow through the seasons.

Choosing Frame Size and Box Configuration
Two early decisions will follow you for years, so it is worth slowing down here.
First, frame size. If you do not own a honey extractor, you will likely borrow or rent one, and your frames have to fit it. We matched our frames to our mentor’s extractor before ordering anything, which saved us from buying equipment that would not work together. Sort this out before you place the order, not after.
Second, box width. Supers and brood boxes commonly come in eight-frame and ten-frame widths. A full deep frame of honey is heavy, and a full box adds up quickly. If lifting sixty to a hundred pounds at the end of a long day gives you pause, the narrower eight-frame boxes are gentler on your back. There is no wrong answer, only the one that fits your body and your setup.
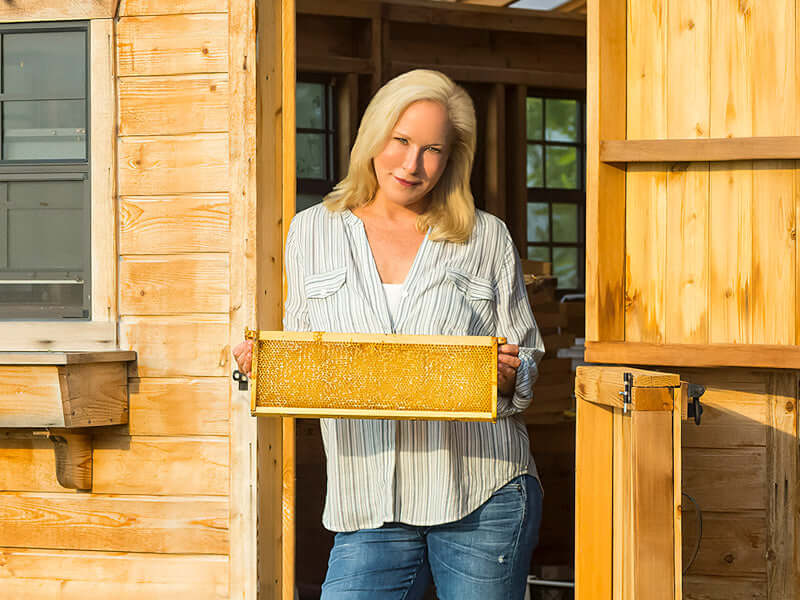
Frames, Foundation, and Comb
Inside each frame is foundation, the sheet that guides bees as they build comb. You will generally choose between waxed plastic foundation and a wax sheet reinforced with crimp wire. We went with waxed plastic because the wire-and-wax style can buckle or break during inspections, and a damaged sheet means redone work. Plastic foundation holds up to regular handling, which matters when you are still learning a gentle touch.
One practical detail worth knowing: foundation made for brood boxes is taller than the foundation used in honey supers, since brood boxes are deeper. Black foundation is popular in the brood nest because pale eggs and young larvae show up clearly against the dark surface, which makes inspections and any state hive checks easier.
What It Costs to Get Started
Costs vary by supplier and region, but our first setup gives you a real-world anchor. The hive itself ran about three hundred dollars, and the bees were roughly eighty dollars. Add a few tools, protective gear, and a feeder, and you have a working sense of a first-year budget. Prices have shifted over the years, so treat these as a starting point and get current quotes before you commit.

Giving a New Package a Head Start
Here is where our hive got its small advantage. A brand new package of bees has to build comb from scratch before the queen can lay, which costs the colony precious time and energy. Because we already kept a hive, we added a few frames of drawn comb to the new box. With comb already built, the queen could begin laying almost as soon as she was released, and the colony skipped a slow, vulnerable stretch.
This is worth repeating clearly, because it is exactly the point that confuses new beekeepers: borrowing a couple of frames of drawn comb to support a fresh package is not the same as splitting a hive. A split creates a whole second colony from an existing one. What we did was simply lend our new bees a foundation of finished comb so they could focus on raising brood instead of building walls. If you do not have a second hive to borrow from, a package on fresh foundation still works beautifully. It just takes a little longer to ramp up.
Setting Up and Installing Your Bees
Once your woodenware is assembled and the exterior is painted, place the hive somewhere protected, ideally with morning sun, afternoon shade, a windbreak, and a nearby water source. Paint or seal only the outside surfaces and leave the interior bare so the bees can build comb naturally. When your package or nucleus arrives and conditions are mild, install the bees, settle the queen, and start feeding to help them establish. From there, your job shifts to patient, regular inspections through the season.
For the season ahead, our walkthrough of honey harvesting from hive to table covers what comes after those first frames fill, and our overview of beekeeping rules and registration explains why registering your hives with the state is a smart early step.
Want the back story on how all of this began for us? It started with paint and bees in our very first beekeeping post.
Watch: Setting Up a New Hive
See the process in action in our video on setting up a new hive, where we walk through combining a brand new hive with frames of drawn comb to give our bees a strong start.
When your own hives start producing more than your family can eat, that surplus is the beginning of something special. You can taste the result of careful hive care in our Eastern Shore Honey collection, each jar a reflection of the same patient work that starts with a single new hive.
FAQs About Starting a New Hive
What is the difference between starting a new hive and splitting a hive?
Starting a new hive means assembling fresh equipment and adding bees you purchase, usually a package or a nucleus colony. Splitting a hive means dividing an established colony you already own into two. A split requires an existing, strong hive to draw frames from, while a new setup begins from scratch.
When should I order bees and equipment for a new hive?
Plan to order bees in January, since suppliers fill up early. Research hives in early February, then order your hive and remaining tools by late February or early March so everything arrives in time to assemble, paint, and place before you install bees in spring.
What are the main parts of a beehive?
A standard hive includes a stand or base, a bottom board, one or more brood boxes, honey supers, frames with foundation, a queen excluder, an inner cover, an outer cover, and an entrance reducer. The boxes stack together, and the frames lift out for inspections and harvest.
Should I choose eight-frame or ten-frame boxes?
It depends on how much weight you want to lift. A full ten-frame box of honey is heavy, so eight-frame boxes are easier to handle if lifting sixty to a hundred pounds is a concern. Ten-frame boxes hold more and mean fewer boxes overall. Match the choice to your strength and setup.
Can I add drawn comb from another hive to a new package?
Yes. If you already keep bees, adding a few frames of drawn comb gives a new package a head start, since the queen can begin laying without waiting for the colony to build comb first. This is a boost for a fresh colony, not a split, and it is optional. A package on new foundation works well too.
Caring for this land and these communities is at the core of who we are. It’s why we created Roots & Wings , our giving initiative that connects every purchase to something that matters. See how we give back.