Skip to content

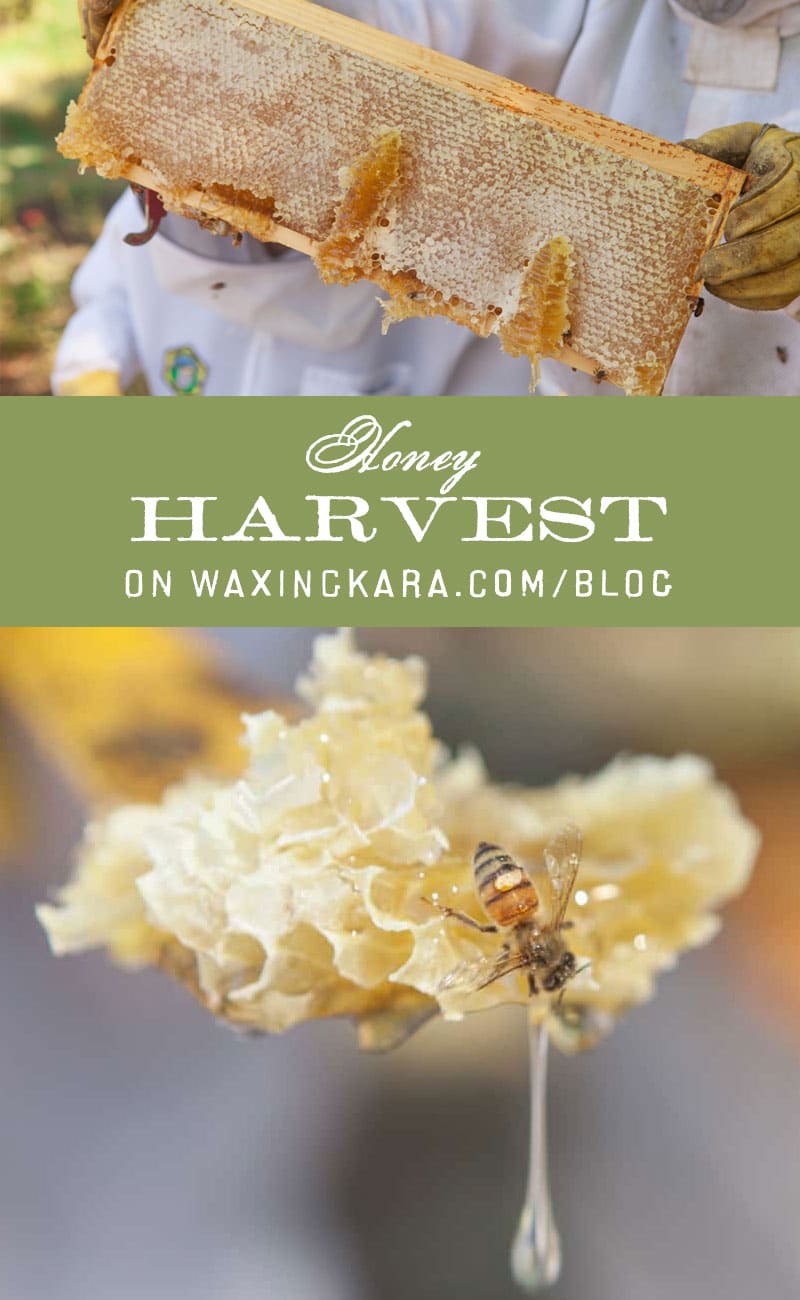
The Sweet Journey of Honey Harvest
Honey harvesting is a magical culmination of the beekeeping journey, representing the delicate partnership between beekeeper and bee colony. As our original article noted, the honey harvest often sneaks up on beekeepers, with bees filling hives faster than expected. This comprehensive guide will walk you through the entire honey harvesting process, exploring the art and science behind collecting nature's liquid gold while maintaining healthy, thriving bee colonies.

Understanding the Honey Flow: When to Harvest
Timing is everything when it comes to honey harvesting. The ideal time to harvest varies depending on your location, climate, and the blooming cycles of local flora.
Generally, the most significant honey flow typically begins in late spring to early summer (June through July) when flowers are in full bloom, though some regions may experience smaller flows earlier in spring. A second harvest often occurs in late summer to early fall. This timing ensures the honey is fully matured and has a low moisture content, which is crucial for preventing fermentation.

Signs Your Honey is Ready for Harvest
Before diving into the harvest, it's important to recognize when your honey is truly ready:
- Capped Honey Cells: When bees have completed the honey-making process, they seal the cells with a thin layer of wax. Look for frames where at least 80-90% of cells are capped, indicating the honey inside has reached the proper moisture content (around 18-20%).
- The "Shake Test": Hold a frame horizontally and give it a gentle shake. If honey drips out, it's not ready for harvest as the moisture content is too high.
- Weather Considerations: Plan your harvest for warm, sunny days. This makes the honey easier to extract and less stressful for the bees. Avoid harvesting during inclement weather or high humidity, which can affect honey quality.
- Hive Strength Assessment: Evaluate the overall health and strength of your colony before harvesting. A strong, healthy hive is better positioned to recover from honey removal and prepare for seasonal changes.

Essential Equipment for Honey Harvesting
Proper equipment makes the honey harvesting process smoother and more efficient:
Protective Gear
- Complete bee suit with veil
- Gloves
- Boots or closed shoes

Harvesting Tools
- Smoker and fuel
- Hive tool
- Bee brush
- Frame gripper
- Escape board or bee blower (for removing bees from honey supers)
- Clean, covered containers for transporting frames

Extraction Equipment
- Uncapping knife (heated or cold) or uncapping fork
- Uncapping tank or container
- Honey extractor (manual or electric)
- Food-grade strainers of various mesh sizes
- Food-grade buckets for collection
- Bottling equipment
- Clean, sterilized jars or containers for storage

The Honey Harvesting Process: Step by Step
1. Preparing the Hive
- Approach the hive calmly and use light puffs of smoke at the entrance and under the hive cover
- Remove the outer and inner covers carefully
- Use additional light smoke as needed to keep bees calm

2. Selecting and Removing Frames
- Inspect each frame to ensure honey is properly capped (80-90%)
- Select only frames from honey supers, not from brood chambers
- Gently brush bees off selected frames or use an escape board/bee blower
- Place bee-free frames in a covered container to prevent robbing

3. Uncapping the Honeycomb
- Work in a clean, enclosed space to prevent bees from following the honey
- Use an uncapping knife or fork to carefully remove the wax cappings
- Collect the wax cappings separately—they're valuable for making candles, balms, and other products
- Place uncapped frames in the extractor

4. Extracting the Honey
- Arrange frames in the extractor, balancing the load
- Start spinning slowly and gradually increase speed
- Extract from both sides of the frame for complete removal
- Allow extracted honey to flow through strainers into collection buckets
5. Filtering and Bottling
- Allow honey to settle in buckets for 24-48 hours to allow air bubbles to rise
- Choose an appropriate filtration method based on your preference (raw honey benefits from minimal filtering)
- Bottle in clean, sterilized containers when honey is clear
- Seal containers tightly and label with harvest date and floral source if known

Post-Harvest Hive Management
Proper care after harvest ensures your colony remains healthy:
Feeding Back to the Bees
- Consider returning wax cappings to the bees—they'll clean off remaining honey
- Assess if supplemental feeding is necessary, especially if harvesting late in the season
- Ensure bees have enough honey stores for winter (at least 60-80 pounds for northern climates)
Hive Inspection and Maintenance
- Perform a thorough post-harvest inspection
- Check for queen presence and brood patterns
- Assess for pests and diseases
- Implement fall management practices to prepare for winter

Specialized Harvesting Techniques
Beyond traditional extraction methods, consider these specialized techniques:
Comb Honey Production
For those interested in producing comb honey (honey sold still in the wax):
- Use special comb honey supers with thin foundation
- Harvest when combs are fully drawn and capped
- Cut into squares and package in special containers
Crush and Strain Method
A simpler approach that requires minimal equipment:
- Cut honeycomb from frames
- Crush the comb to break open cells
- Strain through filters to separate honey from wax
- Best for small-scale operations or beginners
Chunk Honey
A beautiful presentation method:
- Cut sections of capped honeycomb
- Place in jars
- Pour extracted honey around the comb
Common Mistakes to Avoid During Honey Harvest
Even experienced beekeepers can make these mistakes:
- Harvesting too early: Uncapped or partially capped honey may have too high moisture content, leading to fermentation.
- Taking too much honey: Always leave sufficient stores for the bees, especially before winter.
- Poor hive management during harvest: Rough handling can harm the queen or damage the colony.
- Improper storage: Honey should be stored in airtight containers in a cool, dry place to prevent moisture absorption.
- Contamination: Always use food-grade equipment and maintain cleanliness throughout the process.

The Sweet Rewards: Enjoying Your Harvest
After all your hard work, it's time to enjoy the fruits of your labor:
- Taste testing: Different seasons and floral sources produce unique flavor profiles
- Creative uses: Beyond a sweetener, honey can be used in cooking, baking, beverages, and homemade remedies
- Sharing the bounty: Gift jars to friends and family or consider selling at local markets
- Beeswax products: Use the collected wax cappings for candles, balms, and other crafts
The Circle of Beekeeping
Honey harvesting represents the culmination of the beekeeping season, but it's also part of the ongoing cycle of hive management. Each harvest provides not only sweet rewards but also valuable learning experiences that help you become a better beekeeper.
Remember that responsible harvesting practices ensure the continued health and productivity of your colonies. By taking only what the bees can spare and maintaining strong hives, you contribute to the important role honeybees play in our ecosystem while enjoying one of nature's most perfect foods.
Whether you're a novice beekeeper celebrating your first harvest or an experienced apiarist with dozens of hives, the joy and satisfaction of collecting honey connects you to an ancient tradition practiced for thousands of years. Each jar of honey tells the story of your bees, your local flora, and your dedication as a steward of these remarkable creatures.