My quest for fire didn’t begin in caveman times—it began with my first year of beekeeping. Despite all my efforts, I couldn’t match my mentor Dale’s effortless ability to create long-lasting smoke for the hives within minutes. Meanwhile, I fussed endlessly trying to arrange everything just right. This frustration led me down the path of creating homemade fire starters, which turned out to be not just practical for beekeeping but also economical, environmentally friendly, and surprisingly versatile. Old candles can be repurposed to make beeswax fire starters, emphasizing the benefits of reusing materials and reducing waste.
What are Beeswax Fire Starters?
Beeswax fire starters are a fantastic, natural solution for igniting fires, whether you’re cozying up indoors or enjoying an outdoor fire pit. Made from sustainable beeswax, these fire starters are eco-friendly and efficient. They often incorporate other natural materials like dried flowers, pinecones, and cinnamon sticks, creating a unique and effective fire-starting tool. Outdoor enthusiasts, beekeepers, and anyone who values environmentally conscious products will find beeswax fire starters to be a perfect choice. Not only do they burn cleanly, but they also add a pleasant aroma to your fires, making the experience even more enjoyable.
Why Beekeepers Need Reliable Fire Starters
Before diving into how to make these natural wonders, let’s talk about why they’re especially valuable for beekeepers. Smoke is essential when working with hives—it triggers a survival response in bees that makes them focus on preparing to flee rather than defending their home. The smoke also masks alarm pheromones released by guard bees, keeping the entire colony calmer during hive inspections or honey harvests.
Without reliable fire starters, achieving consistent, long-lasting smoke can be challenging, especially for beginners. That’s where the idea of using beeswax and pinecones for fire starters comes in—they’re the perfect solution created from a material beekeepers already have in abundance. Beekeepers should exercise caution when using fire starters around hives to ensure safety.

Why Choose Beeswax and Pine Cones for Fire Starters?
Beeswax offers several distinct advantages that make it ideal for creating reliable fire starters:
- Natural properties: Unlike paraffin or petroleum-based products, beeswax is completely natural and non-toxic when burned.
- Consistent performance: Beeswax burns at a steady rate and maintains a flame long enough to ignite larger materials.
- Water resistance: These starters perform impressively even when wet—perfect for outdoor use in unpredictable weather.
- Pleasant aroma: The subtle honey scent of beeswax enhances the experience, especially when used in home fireplaces. These fire starters are also perfect for enhancing the experience of using outdoor fire pits.
- Renewable resource: For beekeepers, beeswax is a sustainable byproduct that can be put to excellent use.
Beeswax has a melting point of approximately 160°F (60°C) and ignites at around 400°F (204°C). This higher ignition temperature makes it safer to work with than many alternatives, though proper caution is still essential.
Essential Supplies for Making Fire Starters
To get started on your fire starter project, you'll need a few essential supplies:
Basic Ingredients
- Beeswax
- Wicks
- Molds (egg cartons work great)
Natural Enhancers (Optional)
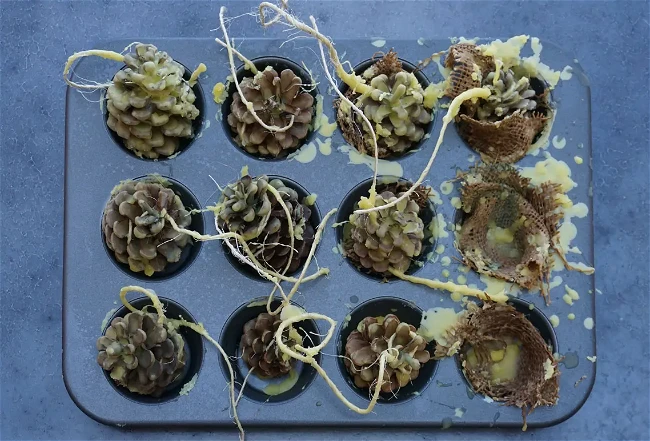
- Pine cones
- Dried herbs
- Dried orange peel
- Bark
- Acorns
- Dried flowers
Eco-Friendly Alternatives
- Shredded paper
- Dryer lint
- Sawdust

Choosing the Right Wick for Your Fire Starter
Selecting the right wick is crucial for ensuring your fire starter burns safely and efficiently. There are several types of wicks to consider, including cotton, paper, and natural fiber twine. The type of wick you choose should match the size of the fire you intend to start and the desired burn time. For instance, a cotton wick is ideal for small fires, providing a quick and steady burn. On the other hand, natural fiber twine wicks are better suited for larger fires, offering a longer burn time. Ensuring the wick is properly sized for your fire starter is essential to prevent issues like overheating or underheating, guaranteeing a reliable and even burn every time.
Step-by-Step Guide to Making Fire Starters
Creating your own fire starters is a fun and rewarding process. Let's break it down into manageable steps:
1. Melting the Beeswax Safely
Safety should always be your top priority when working with beeswax:
- Use a double boiler to melt the wax, ensuring even heating and minimizing the risk of overheating.
- Remember that beeswax melts at around 140°F (60°C) but ignites at 400°F (204°C).
- Always keep a close eye on the melting process and never leave it unattended.
- Exercise caution throughout the entire process of making fire starters to ensure safety.
2. Adding Wicks and Natural Materials
Once your beeswax is melted:
- Prepare the wicks by dipping them in the melted wax and allowing them to cool.
- Cut the prepared wicks into 2-inch pieces.
- For pine cone starters, tie a jute string around the pine cones and dip them in the melted wax.
- Add dried flowers, herbs, and other natural items to personalize your fire starters.
3. Cooling and Storing Your Fire Starters
After adding all components:
- Allow your fire starters to cool completely in a well-ventilated area.
- Once cooled, store them in airtight containers to maintain their effectiveness.
- Keep them in a cool, dry place away from direct sunlight.

Safety Precautions When Working with Fire Starters
Safety should always be a top priority when working with fire starters. Here are some essential precautions to keep in mind:
- Handle fire starters with care, as they are flammable and can ignite easily.
- Store fire starters away from direct sunlight, heat sources, and other flammable materials.
- Use fire starters in well-ventilated areas to avoid the buildup of fumes.
- Never leave a burning fire unattended, and ensure it is fully extinguished before leaving the area.
- Keep children and pets away from fire starters and burning fires.
- Always follow the manufacturer’s instructions for the use and storage of fire starters.
By exercising caution and following these guidelines, you can enjoy the benefits of beeswax fire starters safely and effectively.
How to Use These Fire Starters
Using beeswax fire starters is straightforward and highly effective:
- Place one fire starter at the base of your wood-burning fireplace or outdoor fire pit. These homemade fire starters make it easy to get a fire started quickly and efficiently.
- Use a heat-resistant surface like a metal tin or cast iron skillet for safety.
- Stack logs around the fire starter, ensuring enough space for air circulation.
- Light the wick and allow the fire starter to burn, igniting the surrounding wood.
These versatile starters work well in both indoor and outdoor settings. For indoor use, ensure proper ventilation to avoid smoke buildup.
Troubleshooting Common Issues with Fire Starters
Even with the best preparations, you might encounter some issues with your fire starters. Here are common problems and their solutions:
- Fire starter not igniting: Ensure the wick is properly sized and the fire starter is dry. If needed, try using a different type of wick or add a small amount of petroleum jelly to help with ignition.
- Fire starter not burning evenly: Check that the fire starter is correctly positioned and the wick is centered. Adjust the wick or try a different type of fire starter if necessary.
- Fire starter producing excessive smoke: Make sure the fire starter is well-ventilated and the wick is not too large. You might need to use a different type of wick or adjust the size of the fire starter to reduce smoke production.
By addressing these common issues, you can ensure your beeswax fire starters perform reliably, providing a consistent and enjoyable fire-starting experience.

The Benefits of Making Your Own Fire Starters
Creating your own fire starters comes with numerous advantages:
- Cost-effective: Homemade fire starters can be produced at little to no cost.
- Eco-friendly: Utilizing household waste materials minimizes environmental impact.
- Self-sufficiency: Making your own fire starters enhances your survival skills.
- Reliability: Beeswax fire starters are compact and water-resistant, making them more dependable than many alternatives.
- Customizable: Adding dried herbs or spices can improve scent and aid in ignition.
Additionally, old candles can be repurposed to make beeswax fire starters, emphasizing the benefits of reusing materials and reducing waste.
Creative Gift Ideas Using Beeswax Fire Starters
Beeswax fire starters make fantastic gifts for friends and family, especially those who:
- Enjoy camping and outdoor activities
- Have a fireplace or wood stove
- Appreciate handmade, practical gifts
Present them in decorative containers with simple instructions for a thoughtful, useful gift that showcases your creativity and craftsmanship.
Homemade Fire Starters
Beeswax fire starters are an excellent, natural solution for all your fire-starting needs. They're easy to make, cost-effective, and environmentally friendly. By following the steps outlined in this guide, you can create fire starters that are both functional and beautiful.
So why wait? Gather your supplies, get creative, and start making your own beeswax fire starters today. You'll enjoy both the process and the satisfaction of having reliable, natural fire starters ready whenever you need them.
Frequently Asked Questions
Can I use any type of beeswax for making fire starters?
Yes, you can use any type of beeswax, but pure, unrefined beeswax will give you the best results.
How long do beeswax fire starters last when stored?
When stored properly in airtight containers in a cool, dry place, beeswax fire starters can last for several years.
Can I add scents to my beeswax fire starters?
Absolutely! You can enhance your fire starters by adding essential oils like cinnamon, pine, or lavender for a pleasant aroma.
Are beeswax fire starters safe to use indoors?
Yes, beeswax fire starters are safe for indoor use as long as you ensure proper ventilation and use them on a heat-resistant surface.
What natural materials work best with beeswax fire starters?
Pine cones, dried herbs, bark, and dried citrus peels work exceptionally well with beeswax fire starters, adding both efficacy and pleasant scents.


